React语法
1.声明式
2.基于组件
3.学习一次,随处使用
React语法
一,什么是react

1. React的特点
1 | 1,声明式 |
二,React的使用
1. React的安装
1 | npm i react react-dom |
1 | <body> |
通常我们不使用这个方法创建react元素,比较麻烦
三,React脚手架的使用
1. 初始化项目
1 | npx create-react-app my-app |
2. 启动项目
在项目的根目录执行命令:npm start

出现这个页面也就成功了
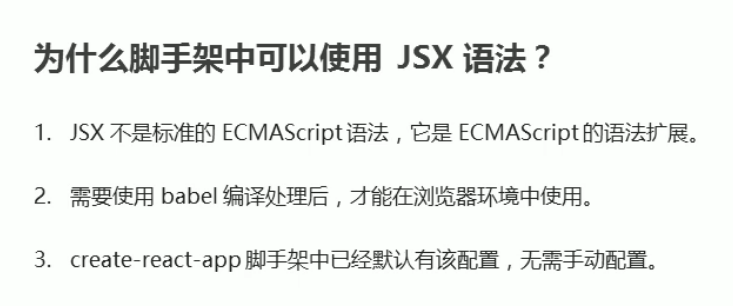
四,JSX的使用
jsx是JavaScript XML 的简写,表示在JavaScript中写XML(html)格式的代码
1. 简单使用
1 | const title = <h1> jsx hello |
3. 推荐写法
React元素的属性名使用驼峰法命名
特殊属性名:
class -> className, for ->htmlFor, tabindex ->tabIndex没有子节点的React元素可以用
/>结束使用小括号包裹jsx,避免js中的自动添加分号陷阱
1
2
3
4
5
6
7
8const title = (
<h1 className="title">
jsx hello
<span> span hello </span>
</h1>
)
ReactDOM.render(title, document.getElementById('root'))
4. 嵌入js表达式
语法格式:{js表达式}
1 | const name = 'Jack' |
5. JSX 的条件渲染
1 |
|
6. JSX 的列表渲染
1 | const songs=[ |
7. JSX的样式喧嚷
行内式—style
1
2
3
4
5
6
7
8// JSX的样式处理
const list=(
<h1 style={{color:'red', backgroundColor:‘skyblue}}>
JSX的样式处理
</h1>
)
//渲染react元素
ReactpoM.render(list,document.getElementById('root"))类名 —-className
五,React 组件使用
- 组件是React的一等公民,使用React就是在用组件
- 组件表示页面中的部分功能
- 组合多个组件实现完整的页面功能
- 特点:可复用、独立、可组合
1. 使用函数创建组件
函数名首字母大写
必须要有返回值(可以返回null)
1
2
3
4
5
6
7
8
9
10
11
12
13
14
15
16
17
18/*
函数组件
*/
// function Hello() {
// return(
// <div>这是一个函数组件</div>
// )
// }
// 箭头函数组件
const Hello = () => <div>这是一个函数组件</div>
ReactDOM.render(
<Hello></Hello>,
document.getElementById('root')
);
2. 类组件
1 | // 类组件 |
3. 抽离到独立的js文件
Hello.js
1
2
3
4
5
6
7
8
9
10
11
12
13import React from 'react'
// 独立的js文件,类组件
class Hello extends React.Component {
render() {
return (
<div>这是一个抽离到js文件的组件</div>
)
}
}
// 导出组件
export default Helloindex.js
1
2
3
4
5
6
7
8
9// 导入组件
import Hello from './Hello'
// 渲染组件
ReactDOM.render(
<Hello />,
document.getElementById('root')
)
六,React 事件处理
1. 事件绑定
React 事件绑定语法与DOM事件语法相似
语法:
on+事件名称=(事件处理程序},比如:onClick={0=>0}注意:React 事件采用驼峰命名法,比如:
onMouseEnter、onFocus// 类组件 class Hello extends React.Component { // 事件处理函数 handleClick(){ console.log('单击事件触发了') } // render 必须要写, render() { return ( <button onClick={this.handleClick}>点击事件</button> ) } } export default Hello
=============
=============
// 函数组件
function App1() {
// 处理函数
function handleClick() {
console.log('函数组件中的事件绑定,')
}
// 必须有return
return (
<button onClick={handleClick}>点我</button>
)
}
ReactDOM.render(
<App1 />,
document.getElementById('root')
)
1
2
3
4
5
6
7
8
9
10
11
12
13
14
15
16
17
18
19
20
21
22
23
24
25
26
27
28
29
30
31
32
33
34
35
36
37
38
39
40
41
42
43
44
45
46
47
48
49
50
51
52
53
54
55
56
57
58
59
60
61
62
63
64
65
66
67
68
69
70
71
72
73
74
##### 2. **事件对象**
- 可以通过事件处理程序的参数获取到事件对象
- React中的事件对象叫做:**合成事件**(对象)
- 合成事件:兼容所有浏览器,无需担心跨浏览器兼容性问题
- ```
function App1() {
function handleClick(e) {
// 阻止浏览器的默认行为
// e.preventDefault()
console.log('a标签单击事件触发了')
}
return (
<a href="http://www.baidu.com" onClick={handleClick}>点击事件</a>
)
}
ReactDOM.render(
<App1 />,
document.getElementById('root')
)
##### 3. **有状态组件和无状态组件**
- 函数组件又叫做无状态组件,类组件又叫做有状态组件
- 状态(state)即数据
- 函数组件没有自己的状态,**只负责数据展示**(静)
- 类组件有自己的状态,**负责更新Ul**,让页面“动”起来
- ```
// 类组件
class Hello extends React.Component {
/* constructor(){
// ES6 规范
super()
// 初始化state
this.state = {
count: 0
}
} */
// 简写语法 初始化state
state = {
count: 20
}
// render 必须要写,
render() {
return (
<div>
<p>
计算器:{this.state.count}
</p>
</div>
)
}
}
export default Hello
- **总结**
- 状态即数据
- 状态是私有的,只能在组件内部使用
- 通过this.state来获取状态4. setState()修改状态
- 状态是可变的
- 语法:this.setState({要修改的数据})
- 注意:不要直接修改state中的值,这是错误的!!!
- setState0作用:**1.修改state 2.更新Ul**
- 思想:**数据驱动视图**
1
2
3
4
5
6
7
8
9
10
11
12
13
14
15
16
17
18
19
20
21
22
23
24
25
26
27
28
29
30
31
32
33
34
35
36
37
38
39
40
41
42
43
44
45
46
47
48
49
50
51
52
53
54
55
56
57
//正确
this.setState({
count:this.state.count +1
})
//错误
this.state.count +=1
==================
==================
// 简写语法 初始化state
state = {
count: 20
}
// render 必须要写,
render() {
return (
<div>
<p>
计算器:{this.state.count}
</p>
<button onClick={() =>{
this.setState({
count: this.state.count +1
})
}}>+1</button>
</div>
)
}
**事件处理程序**
- 原因:事件处理程序中this的值为undefined
- 希望:this 指向组件实例(render方法中的this即为组件实例)
##### 5. **事件绑定this指向**
1. 箭头函数
- 利用箭头函数自身不绑定this的特点
- ```
class Hello extends React.Component{
onIncrement() {
console.log('this的对象',this)
this.setState({
count: this.state.count +1
})
}
render() {
//箭头函数中的this指向外部环境,此处为:render()方法
return(
<button onclick={() => this.onIncrement() }></button>
)
}
Function.prototype.bind( )
利用ES5中的bind方法,将事件处理程序中的this与组件实例绑定到一起
class Hello extends React.Component{ constructor() { super() // bind方法 this.onIncrement = this.onIncrement.bind(this) } //...省略onIncrement render() { return( <button onclick={this.onIncrement}></button> ) } }1
2
3
4
5
6
7
8
9
10
11
12
13
14
15
16
3. **class的实例方法**
- 利用箭头函数形式的class实例方法
- ·注意:该语法是实验性语法,但是,由于babel的存在可以直接使用
- ```
class Hello extends React.Component{
onIncrement = () =>{
this.setstate({.…})
render() {
return(
<button onclick={this.onIncrement}></button>
)
}
七,表单处理
1. 受控组件
让state与表单元素的value绑定(控制表单元素值的来源)
onChange事件函数来控制state
// 简写语法 初始化state state = { txt: '请输入' } inDate = (e) => { this.setState({ txt: e.target.value }) console.log(this.state.txt)
}
// render 必须要写,
render() {
return (
<div>
<input type='text' value={this.state.txt}
onChange={this.inDate}></input>
</div>
)
}
1
2
3
4
5
6
7
8
9
**多表单元素优化步骤**
1. 给表单元素添加name属性,名称与state相同
2. 根据表单元素类型获取对应值
3. 在change 事件处理程序中通过`[name]`来修改对应的state
<input
type="text"
name="txt"
value={this.state.txt}
onChange={this.handleForm}
/>
1
handleForm = e =>{
const target = e.target
//根据表单元素类型获取值type="text"
const value = target.type === 'checkbox'
? target.checked
: target.value
//根据name设置对应state
this.setstate({
[name]:value
})
}
1
2
3
4
5
##### 2. 非受控组件
**使用步骤:**
1.调用React.createRef0方法创建一个ref对象
constructor(){
super()
this.txtRef=React.createRef()
}
1
2
3
2.将创建好的ref对象添加到文本框中
<input type=”text”ref={this.txtRef}/>
1
2
3
3.通过ref 对象获取到文框的值
Console.log(this.txtRef.current.value)
1
2
3
4
5
6
7
8
9
10
11
12
13
14
15
16
17
18
19
20
21
22
23
24
25
26
27
28
29
**不建议使用非受控组件**
**React组建基础---总结**
1.组件的两种创建方式:函数组件和类组件
2.无状态(函数)组件,负责静态结构展示
3.有状态(类)组件,负责更新Ul,让页面动起来
4.绑定事件注意this 指向问题
5.推荐使用受控组件来处理表单6.完全利用JS语言的能力创建组件,这是React的思想
### 八,组件的进阶
##### 1.组建的props
- 组件是封闭的,要接收外部的数据应该通过 `props`来实现
- **props的作用:接收传递给组件的数据**
- 传递数据:**给组件表亲啊添加属性**
- 接收数据:函数组件通过参数 `props`接收数据,类组件通过 `this.props`接收数据
class Hello extends React.Component {
// render 必须要写,
render() {
// 类组件中 props
console.log(this.props);
return (
<div>
<h1>props: {this.props.name} </h1>
</div>
)
}}
// 函数组件
const Hello1 = props =>{
// props 是一个对象
console.log(props);
return (
props: {this.props.name}
)
}
// 传入数据 数字类型 {数字}
ReactDOM.render(
document.getElementById(‘root’)
)
1 |
|
2.Context
使用步骤
1.调用
React.createContext()创建Provider(提供数据)和Consumer(消费数据)两个组件const {Provider, Consumer} = React.createContext()1
2
3
4
5
6
7
8
9
10
11
- 2.使用Provider组件作为父节点
- ```
<Provider>
<div>
<Child />
</div>
</Provider>
总结
1.如果两个组件是远方亲戚(比如,嵌套多层)可以使用Context实现组件通讯
2.Context提供了两个组件:
Provider和Consumer3.Provider组件:用来提供数据
4.Consumer组件;用来消费数据
3.Children 属性
- children属性:表示组件标签的子节点。当组件标签有子节点时,props就会有该属性
- children属性与普通的props一样,值可以是任意值(文本、React元素、组件,甚至是函数)
1 | const Test = () => <button>我是button组件</button> |
4.props校验
1.props校验:允许在创建组件的时候,就指定props的类型、格式等
作用:捕获使用组件时因为props导致的错误,给出明确的错误提示,增加组件的健壮性
使用步骤
1. 安装包 prop-types(yarm add prop-types/npm i props-types) 2. 导入prop-types包 3. 使用 组件名.propTypes = {} 来给组件的props添加校验规则
import PropTypes from ‘prop-types’
function App (props){
return (
Hi, {props.colors}
)
}
App.propTypes = {
// 约定color属性为array类型
//如果类型不对,则报出明确错误,便于分析错误原因
colors: PropTypes.array
}
1
2
3
4
5
6
7
  **约束规则**
  1.常见类型:array、bool、func、number、object、string
  2.React元素类型:element

##### 5.**props默认值**
// props默认值
const App = props => {
console.log(props)
return (
此处展示props的默认值:{props.pagesize}
)
}
//添加props默认值
App.defaultProps = {
pagesize: 10
}
ReactpoM.render(<App pagesize = { 20} />, document.getElementById(“root”))
1 |
|
class Mouse extends React.Component{
//.省略state和操作state的方法
render(){
return this.props.render(this.state)
}
<Mouse render={(mouse) =>
鼠标当前位置{mouse.x},{mouse.y}
}/>1 |
|
// 创建高阶组件
function withMouse(WrappedComponent) {
// 该组件提供复用的状态逻辑
class Mouse extends React.Component {
// 鼠标状态
state ={
x:0.
y:0
}
handleMouseMove = e =>{
  this.setState({
    x: e.clientX,
    y: e.clientY
  })
}

// 控制鼠标状态的逻辑
componentDidMount(){
  window.addEentListener('mousemove',this.handleMouseMove)
}

componentwi11unmount(){
  window.removeEventListener('mousemove',this.handleMouseMove)
}

render() {
  return <WrappedComponent {...this.state} />
}
}
return Mouse
}
//创建组件
const MousePosition=withMouse(Position)
//渲染组件
1 |
|
// 设置displayName
Mouse.displayName = WithMouse${getDisplayNmae(WrappedComponent)}
return Mouse
}
function getDisplayNmae(WrappedComponent) {
return WrappedComponent.displayName || WrappedComponent.name || ‘Component’
}
1 |
|
render() {
return <WrappedComponent {…this.state} {…this.props} />
}
1 |
|
推荐语法
推荐:使用
setState((state,props) => {})参数state:表示最新的state
参数props:表示最新的props
handleclick = () => { //此处,更新state // 注意:这种语法也是异步更新的 this.setState((state, props) => { return { count: state.count + 1 } }) console.log('count:', this.state.count) //1 }1
2
3
4
5
6
7
8
9
10
11
12
13
- **1.3第二个参数**
- 场景:在状态更新(页面完成重新渲染)后立即执行某个操作
- 语法:`setState(updaterLcallback])`
- ```
this.setstate(
(state, props) => {},
() => {console.log('这个回调函数会在状态更新后立即执行')}
)
2.组件更新机制
setState()的两个作用:1.修改state 2,更新组件(UI)- 过程:父组件重新渲染时,也会重新渲染子组件,但只会渲染当前组件子树(当前组件及其所有子组件0

3.组件的性能优化
state 不要存储与渲染无关的数据
避免不必要的重新渲染
解决方式:使用钩子函数
shouldComponentUpdate(nextProps,nextState)作用:通过返回值决定该组件是否重新渲染,返回true表示重新渲染,false表示不重新渲染
触发时机:更新阶段的钩子函数,组件重新渲染前执行
(shouldComponentUpdate→render)class Hello extends Component { shouldComponentUpdate(){ //根据条件,决定是否重新渲染组件 return false } render(){...} }1
2
3
4
5
6
7
8
9
10
11
12
13
14
15
16
17
18
19
20
##### 4.纯组件
- 说明:纯组件的内部对比是`shallow compare`(浅层对比)
- 对于引用类型来说:只比较对象的引用(地址)是否相同
- 注意:**state或props中的属性值为引用类型时,应该创建新数据,不要直接修改源数据**
- ```
//正确!创建新数据
const newobj = { ...state.obj,number:2}
setstate({ obj: newobj })
//正确!创建新数据
//不要用数组的push/unshift等直接修改当前数组的的方法
//而应该用concat或slice等这些返回新数组的方法
this.setstate({
list: [...this.state.list,{ 新数据 }]
})
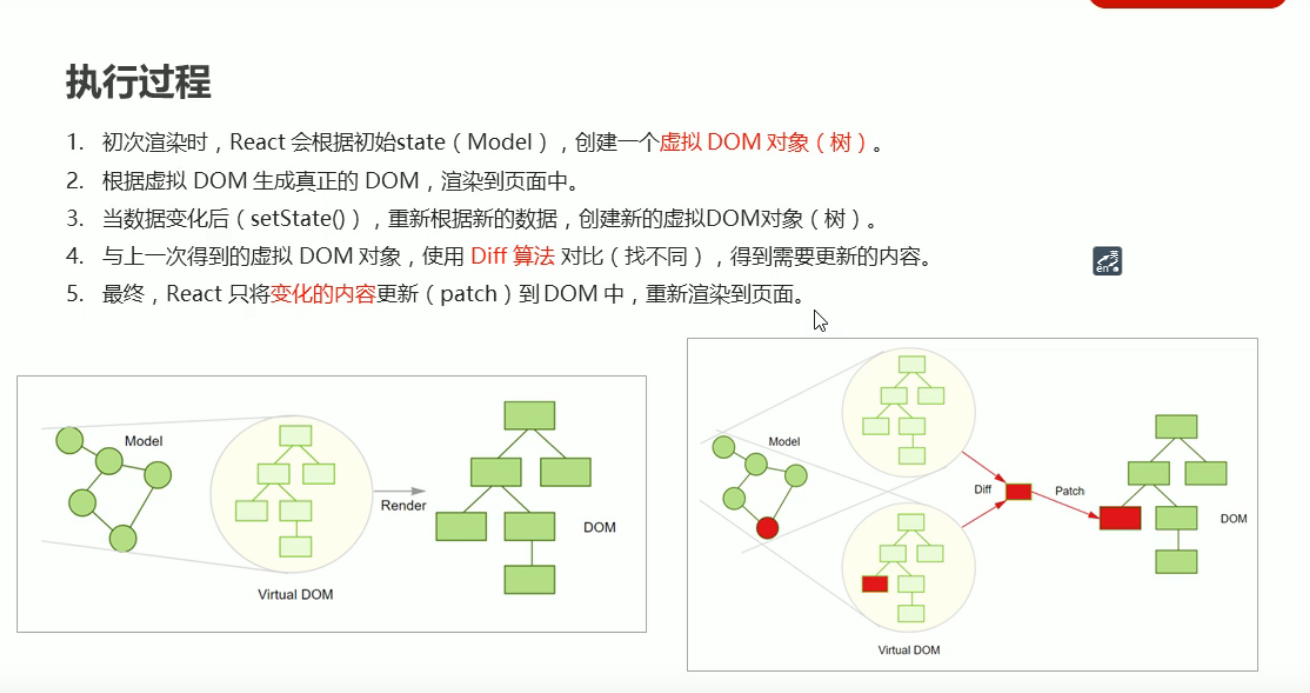
5.虚拟DOM,diff算法

6.React 原理揭秘
1.工作角度:应用第一,原理第二。
2.原理有助于更好地理解 React的自身运行机制。
3.setState0异步更新数据。
4.父组件更新导致子组件更新,纯组件提升性能。
5.思路清晰简单为前提,虚拟DOM和Dif保效率。
6.虚拟DOM>state+JSX。
7.虚拟DOM的真正价值从来都不是性能。
十,路由的基本使用
1.安装 npm i react-router-dom
2.导入路由 组件
1 | import {BrowserRouter as Router, Route, Link} from 'react-router-dom' |
3.使用Router组件包裹整个应用(重要)
1 | <Router> |
案例
- path 会与pathname 匹配
1 | import { BrowserRouter as Router,Route,Link } from 'react-router-dom' |
2.路由的执行过程
点击Link 组件(a标签),修改了浏览器地址栏中的url。
React 路由监听到地址栏url的变化。
React 路由内部遍历所有 Route组件,使用路由规则(path)与pathname进行匹配。
当路由规则(path)能够匹配地址栏中的pathname时,就展示该Route组件的内容。
添加
exact属性 精确匹配 只有当path和pathname完全匹配才会展示该路由// 此时,该组件只能匹配 pathname="/first" 这种情况 <Route exact path="/first" component={First} />React路由的一切都是组件,可以像思考组件一样思考路由
