Python 单例方法
异步方案 celery 发短信
Python 单例方法
1 |
|
使用单例 控制 只有一个短信发送对象
内存优化,减少内存消耗
使用pipline 操作redis
1 | pl = redis.cli.pipeline() |
异步方案 celery 发短信
生产消费者模式
安装celery创建sms 包,并添加异步
1
pip install -U celery
在根目录下 创建celery的包

main.py
- 1 设置django环境
2 创建celery对象
3 设置 broker
4 celery自动检测任务
1
2
3
4
5
6
7
8
9
10
11
12
13
14
15
16
17import os
# 1 设置django环境
# set the default Django settings module for the 'celery' program.
from celery import Celery
os.environ.setdefault('DJANGO_SETTINGS_MODULE', 'meiduo.settings')
# 2 创建celery对象
app = Celery('celery_tasks')
# 3 设置 broker
app.config_from_object("celery_tasks.config")
# 4celery自动检测任务 这里会自动去celery_tasks.sms下找tasks.py
app.autodiscover_tasks(['celery_tasks.sms'])- 1 设置django环境
redis 作为队列
- config.py
1
2
3
4
5
# 把redis 作为队列
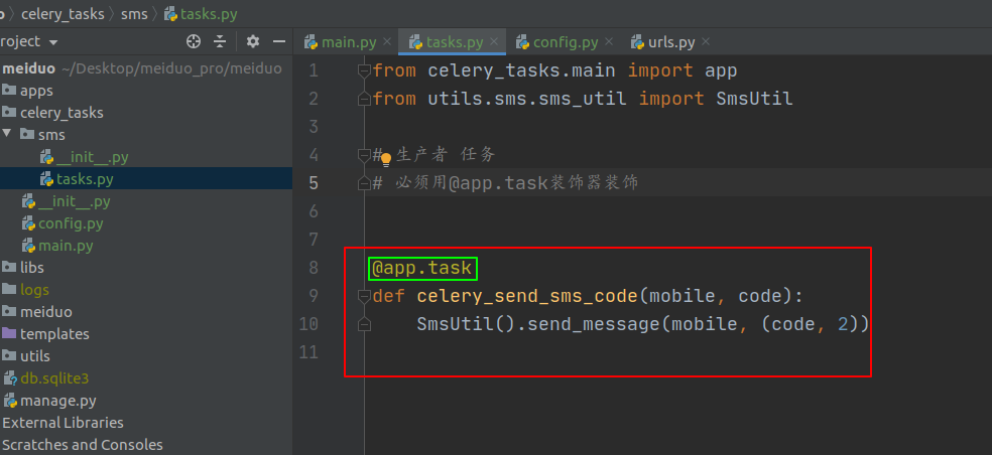
broker_url = "redis://127.0.0.1/15"sms的tasks.py里添加任务
- tasks.py文件名不可改变
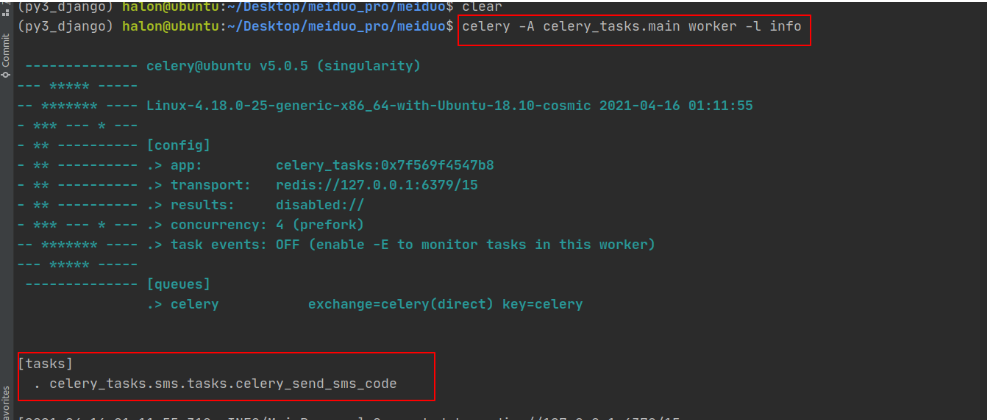
启动celery
1 | celery -A celery_tasks.main worker -l info |
win10 遇到的小bug
开启服务发现,任务并未执行 上网查资料后发现,celery 对win10 支持并不是很好
解决此方案的
方案1
添加–pool=solo参数
1
2
celery -A celery_tasks.main worker --pool=solo -l info方案2
先安装gevent,然后在启动celery的时候添加gevent参数
1
2
pip install gevent
celery -A celery_tasks.main worker -l info -P gevent
参考资料:https://stackoverflow.com/questions/37255548/how-to-run-celery-on-windows
Django 地址设计
省市区三级联动
缓存省市区数据
提示:
- 省市区数据是我们动态查询的结果。
- 但是省市区数据不是频繁变化的数据,所以没有必要每次都重新查询。
- 所以我们可以选择对省市区数据进行缓存处理。
缓存方式
from django.core.cache import cache- 存储缓存数据:
cache.set('key', 内容, 有效期) - 读取缓存数据:
cache.get('key') - 删除缓存数据:
cache.delete('key') - 注意:存储进去和读取出来的数据类型相同,所以读取出来后可以直接使用。
缓存逻辑实现
- 省份缓存数据
cache.set('province_list', province_list, 3600)
- 市或区缓存数据
cache.set('sub_area_' + area_id, sub_data, 3600)
- 省份缓存数据
省级三联orm
1 | # 查询所有省份 |
查询市级
1 | select * from tb_areas where parent_id=130000; # 市 |